Case Study: Ashy Brow Colour Correction
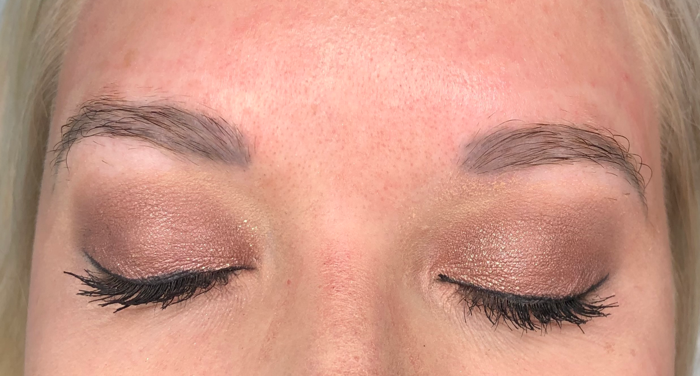
 Before
In this case study, Jenny Leblanc, PMU artist located in Utah, shows us how she approached a challenging case by colour correcting grey/ashy microbladed strokes. This is something that is so often seen but can be difficult to navigate and correct as an artist. We’re going to share with you how Jenny approached this client to give her new, refreshed and flawless brows!
Procedure Details
 Before
My client had previous microblading done 4 years ago, the colour healed quite ashy, the strokes had started to blur, the shape was uneven and there was some scar tissue as well.
Client's Goal
My client was looking for a natural fluffy brow with a defined look but ONLY with microbladed strokes. She also wanted a nice dark brown brow colour but with absolutely NO WARMTH.
I let my client know that colour correction is difficult and may take 2-3 sessions to achieve the desired look. It is extremely important to set realistic expectations for your clients so they know exactly what to expect throughout the whole process. I focus on being open and optimistic to confidently guide them through their new journey
Skin Type
My client has a fair, cool Fitzpatrick 2 skin tone with very light blonde hair. She has sensitive skin, is known to be a “bleeder” and uses some glycolic creams on her face. There was some scar tissue from the previous procedure as well. Knowing that scar tissue can be difficult as you do not know exactly how the pigment will hold, I knew I would need to focus more here. With my experience and expertise, I was confident in my ability to correct her brows.
Design Approach
Based on her facial shape and brow bones, I felt her brows were too far apart and would be better suited closer together. She did only want microbladed strokes, however, in order to cover her previous PMU properly, a combination of microblading and shading would be the best choice for her. The strokes had blurred together, so the additional shading is needed to correct those areas. A combination of microblading and shading will allow me to create the natural, airy hair strokes at the front of her brows while adding definition with shading to achieve the fluffy brows she was looking for.
Her previous PMU was not 50% faded, this meant the pigment colour would need to be warm enough to correct the coolness, yet still dark enough to cover. I started by showing my client the Tina Davies Colour Chart.

Tina Davies I❤️INK Colour Chart
I asked what colour did she feel most comfortable with based on her personal makeup choices, this gives me a feeling of where that client is used to wearing her brows. She selected Dark Brown but was worried it would be too warm. We decided on a combination of Dark Brown mixed with Ash Brown (ratio 1:½). Dark Brown will add the warmth to combat the grey tone while giving her that dark brown result while the Ash Brown will provide additional coolness assurance for the microbladed strokes.
For shading, I chose to go with just Dark Brown, Since we needed to cover the blurred strokes, the warmth of the dark brown would correct the cool ashy colour. I let her know, if upon touch up it healed warmer than she liked, we could adjust this and add more coolness. Luckily my client is in the makeup business, understanding colour theory herself, she was comfortable with my suggestion.
Technique(s) Required
In order to cover the previous microbladed strokes, a combination of microblading and shading is needed. Since the strokes had started to blur, just adding microbladed strokes alone will not be enough to cover. You will need to add shading in between the strokes in order to correct these areas. Also, with her having scar tissue, shading is the best way to get the pigment implanted into the skin, strokes do not tend to take well to scar tissue.
Knowing that my client is a “bleeder”, I would need to be EXTRA careful with my pressure throughout the entire procedure. With a client that tends to bleed, it is important to have secondary numbing with epinephrine. Numbing creams that contain epinephrine will constrict the blood flow, slow down the bleeding and “blanche” the skin around the brows. If a client is bleeding too much, the pigment will not implant properly into the skin.
Pro Tip: Always make notes about your clients bleeding, whether no bleeding, little, medium or heavy, this will allow you to go back on your notes during the touch up if the pigment did not heal properly.
Prep & Pre-Draw
I begin by numbing my clients with Zensa numbing cream first, once complete I then wipe off and start the pre-draw. I like to keep my area clean and simple, outlining the brow to know where I want to stay within my shape. As for my stroke pattern, I follow the clients natural hair growth as this allows for a very natural looking brow.
 Pre-Draw
Plan of Action: Procedure 1
I started by creating my microbladed strokes using the Tina Davies Essential 18U Nano Microblade, this allows me to create curved, natural and fine hair strokes in the pigment combination of Dark Brown and Ash Brown (ratio 1:½). Since her previous strokes had blurred, I approached this pattern as if there were no prior strokes, following her original hair growth to keep it looking natural. On my first pass I try to get in all of my hair strokes. Remembering to watch my pressure, work slowly and stretch. Once my first pass was finished I added my secondary numbing with epinephrine, Magic, to control the bleeding in areas and began working on the other brow. On the second pass I go over each stroke and adjust my pressure according to how deep/thick the stroke already is and fill in any gaps with additional strokes. I will do a third pass to go over any last strokes if they need more colour or depth. I noted my client experienced medium to heavy bleeding in certain areas.
Pro Tip: Have a stroke that’s bleeding and you don’t want to wipe? Use a Q-Tip to blot and apply pressure to slow bleeding. This will allow you to still work within the lines and be more precise.
 Microbladed Strokes Only
Now that the hair strokes were completed, I started shading with Dark Brown between the strokes and throughout the brow using a (SoftTap24) manual shader. I started in the tail and worked my way through with less shading at the front of the brow. I did not dilute my pigment as I have an EXTREMELY soft touch and prefer to slowly build the colour up. Since my client did experience more bleeding, the less trauma I caused, the better.

Healed

Healed 1st Session
Plan of Action: Touch-Up Procedure
Upon touch up, my client's brows healed quite nicely, I noted that some areas that had scar tissue did not hold the strokes well, so would need to focus on shading these areas. My client let me know that she would like to go even darker and have a bit more shading in the fronts of her brows. We decided to use Bold Brown mixed with Ash Brown (ratio 1:½) for microblade strokes this time, as Bold Brown will give her that darker, more defined look she wanted. I completed 3 passes of microblading on each brow, checking each stroke, adding where needed and reinforcing strokes that did not land correctly, watching my pressure throughout. For shading, I again started shading with Dark Brown, however, after my first pass I thought it was still looking too warm and decided to switch to a slightly cooler pigment Perma Blend Espresso for the last pass.

Thanks to my notes, I knew the client was a medium to heavy bleeder, so made sure to work with a light pressure and use my epinephrine numbing cream to assist. On the second procedure she did bleed a bit more than the previous procedure, but nothing uncontrollable.
Here are the final healed results. After two full sessions of colour correction, my client has perfect eyebrows!
Healed


Procedure Notes 1st Appointment:
Age: 26
Fitzpatrick: Fair 2
Skin Type: Thin Apple, Sensitive to the touch, Medium to Heavy bleeder
Method: Blade & Shade. Tina Davies Essential 18U Nano Microblade and SoftTap24 manual shader.
Pigment Colour: Microbladed Strokes: I ❤️ Ink Tina Davies X Perma Blend in DARK BROWN and ASH BROWN (Ratio: 1:½)
Shading: I ❤️ Ink Tina Davies X Perma Blend in DARK BROWN
Artist: Jenny LeBlanc @leblancartistry
Age: 26
Fitzpatrick: Fair 2
Skin Type: Thin Apple, Sensitive to the touch, Medium to Heavy bleeder
Method: Blade & Shade. Tina Davies Essential 18U Nano Microblade and SoftTap24 manual shader.
Pigment Colour: Microbladed Strokes: I ❤️ Ink Tina Davies X Perma Blend in BOLD BROWN and ASH BROWN Ratio: 1:½.
Shading: I ❤️ Ink Tina Davies X Perma Blend in DARK BROWN 1 pass & 1 pass Perma Blend ESPRESSO
Artist: Jenny LeBlanc @leblancartistry


Leave a comment
This site is protected by hCaptcha and the hCaptcha Privacy Policy and Terms of Service apply.